DIY: No Paint Striped Walls
One my inspiration pictures for my sister's new-ish apt was this striped wonder from Country Living.

I knew that the key to my look would have to be the striped walls. Since she is renting the apartment I knew that we couldn't really paint or wallpaper. I knew that some people had added stripes with floral/Japenese tape, but both of those options were not the right color or width. I toyed with the idea of ribbon, but wasn't sure how straight it would come out so I searched for an idea.
After a little thinking the idea came to me!

Electrical tape was the perfect fix. It was the color I wanted and would be easy to apply and remove. Plus after a trial run in my own home I was certain that it wouldn't ruin the paint job underneath the tape.
I wanted something wider than the traditional electrical tape that you can find at your local home improvement store so I did a quick search online and found out I could order 2" on Amazon.
Now in order to figure out how many stripes you can do on you wall you need to figure out how long your walls are.
For example if your walls are 8 ft tall and the roll of electrical tape is 60 ft then divide 60 into 8 and you will see that you can get 7.5 stripes on your wall. I would round down to 7.
*You should totally do this before measuring. I only ordered 2 rolls because 60 ft per roll sounded like a lot, but in the end I would have liked more lines. So I'm going to order more...just don't tell Jon yet. :)
Now start on one side of the wall and slowly go down the wall:
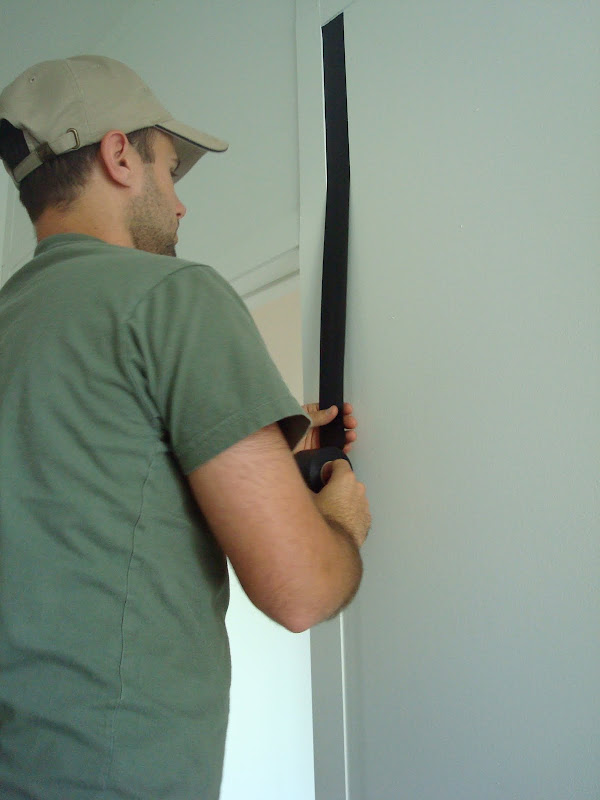
After a couple of rows we realized that the best way to get the tape on properly was to stick the tape up where you want to start from and then loosen the tape from the roll for the entire length of the wall. Once it loose slowly start pressing it onto the wall about 6 inches at a time so you don't get any bubbles.

To get a clean line at the bottom we simply used a razor blade to make the cut.
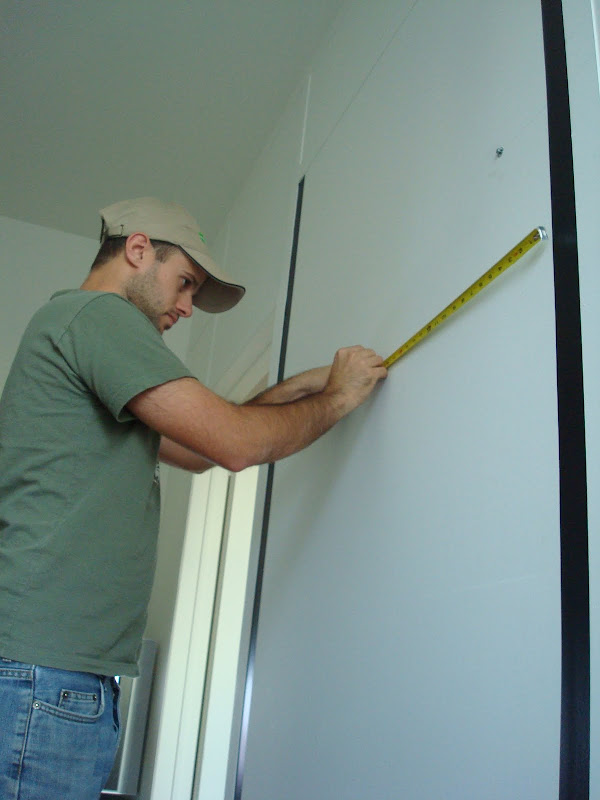
After the first piece is down you now want to go to the opposite side (aka the place on the wall where your last stripe is going to be) and apply the tape.
Now that you have your first stripe and your last stripe you need to do the middle stripe.

To figure out the middle here is what you do:
Let's say the open distance between the first stripe and your last stripe is 5 1/2" "half of that is 2 3/4" making that your center line. Since our tape was 2" wide we wanted the center of the tape to be at the 2 3/4" mark. Because the tape is not clear you won't be able to see your center line while applying the tape. Since the tape is 2" wide the center line of the tape is 1". Therefore if you add 1" to your center line you can run the edge of the tape down a marked line that you can see. Sounds confusing, but once you're doing it (or aka having Jon do it because you are laying on sofa watching Troy :) ) you realize it's not that. (Don't worry I did help I just sat for a couple of mins.)
Jon made a little diagram to show how it should look:

Make a small mark where your middle stripe is going to go:

You want your stripe to be straight so much sure your make marks every couple of inches on the length of the wall:
Up:
and down he went:

Apply middle stripe:

To fill the wall you just need to continue doing the steps above and after a little bit of time you will have something like this:

If you make a mistake you can easily peel it right off.

Like I mentioned before the tape in my experience will not damage any of the paint on the wall. It comes off clean.

At this point you'll probably be feeling a bit nutty. Jon decided to use some tape and act silly:

Once your stripes are up you can hang up your artwork.

The room is only about 7 ft wide so it's hard to take pictures. I tried another angle to get more of the gallery wall:

I reused pieces from their old apt so the whole project only cost around $10!
Close up of one section:

Room shot:


I knew that the key to my look would have to be the striped walls. Since she is renting the apartment I knew that we couldn't really paint or wallpaper. I knew that some people had added stripes with floral/Japenese tape, but both of those options were not the right color or width. I toyed with the idea of ribbon, but wasn't sure how straight it would come out so I searched for an idea.
After a little thinking the idea came to me!

Electrical tape was the perfect fix. It was the color I wanted and would be easy to apply and remove. Plus after a trial run in my own home I was certain that it wouldn't ruin the paint job underneath the tape.
I wanted something wider than the traditional electrical tape that you can find at your local home improvement store so I did a quick search online and found out I could order 2" on Amazon.
Now in order to figure out how many stripes you can do on you wall you need to figure out how long your walls are.
For example if your walls are 8 ft tall and the roll of electrical tape is 60 ft then divide 60 into 8 and you will see that you can get 7.5 stripes on your wall. I would round down to 7.
*You should totally do this before measuring. I only ordered 2 rolls because 60 ft per roll sounded like a lot, but in the end I would have liked more lines. So I'm going to order more...just don't tell Jon yet. :)
Now start on one side of the wall and slowly go down the wall:

After a couple of rows we realized that the best way to get the tape on properly was to stick the tape up where you want to start from and then loosen the tape from the roll for the entire length of the wall. Once it loose slowly start pressing it onto the wall about 6 inches at a time so you don't get any bubbles.

To get a clean line at the bottom we simply used a razor blade to make the cut.
After the first piece is down you now want to go to the opposite side (aka the place on the wall where your last stripe is going to be) and apply the tape.
Now that you have your first stripe and your last stripe you need to do the middle stripe.

To figure out the middle here is what you do:
Let's say the open distance between the first stripe and your last stripe is 5 1/2" "half of that is 2 3/4" making that your center line. Since our tape was 2" wide we wanted the center of the tape to be at the 2 3/4" mark. Because the tape is not clear you won't be able to see your center line while applying the tape. Since the tape is 2" wide the center line of the tape is 1". Therefore if you add 1" to your center line you can run the edge of the tape down a marked line that you can see. Sounds confusing, but once you're doing it (or aka having Jon do it because you are laying on sofa watching Troy :) ) you realize it's not that. (Don't worry I did help I just sat for a couple of mins.)
Jon made a little diagram to show how it should look:

Make a small mark where your middle stripe is going to go:

You want your stripe to be straight so much sure your make marks every couple of inches on the length of the wall:
Up:

and down he went:

Apply middle stripe:

To fill the wall you just need to continue doing the steps above and after a little bit of time you will have something like this:

If you make a mistake you can easily peel it right off.

Like I mentioned before the tape in my experience will not damage any of the paint on the wall. It comes off clean.

At this point you'll probably be feeling a bit nutty. Jon decided to use some tape and act silly:

Once your stripes are up you can hang up your artwork.

The room is only about 7 ft wide so it's hard to take pictures. I tried another angle to get more of the gallery wall:

I reused pieces from their old apt so the whole project only cost around $10!
Close up of one section:

Room shot:

Labels: DIY
posted by High-Heeled Foot in the door at
8:30 AM
![]()

39 Comments:
Wow, how clever and really striking! Your pictures looks wonderful! Don't know if I would be up for that task though! You are very creative and brave to take on these projects!
wowwie- zowwie :) THIS is a great look! I have seen contact paper used before... but this is a really great, super graphic way to add a punch of pattern to any space! Thanks for sharing!
abodelove.blogspot.com
Now that's amazing!! Love the transformation...
LOVE this! What a fantastic solution to all the "red tape" of the apartment. I love the graphic appeal, and it makes such a lovely statement.
Well done!
XO,
Sara Kate
Looks like a lot of hard work to me. I do like the idea of being able to just pull it off when you get tired of it.
The stripes look amazing! I absolutely love your style and your creative ideas!
I love that you used electrical tape! Such a freaking good idea!!
Today you ROCK! What a fabulous idea
GREAT idea!! So creative! Love it.
This is such a brilliant idea and finished look is fantastic!!
What a creative idea! So perfect for apartment dwellers. I'm definitely keeping this in my idea book!! Love it!
that sweet man of yours, at it again...
So happy you guys like it. It actually didn't take that long. Putting any sort of stripes on the wall whether they are painted on or placed with Japanese masking tape or contact paper takes measuring.
Once you do a couple of stripes you just go with the flow and it moves rather quickly.
you should really start to hire your hubby out. i tried to paint stripes in my bathroom about a year ago and it was fail big time..we figured out i used the wrong tape..apparently regular blue tape doesn't work. it bleeds through..who knew. but i'm lazy and my ghetto stripes are still on my wall.
So cool! I am going to share this on my blog :)
that's fantastic! looks gorgeous...
Another chic project on the cheap! Love it!
Thanks for sharing your talents with us!
P.S. Check out the Design Challenge on the Babs Blog. Won't take much time, and the winner gets $100 worth of jewelry. :)
WOW! You are so talented and clever! I never would have thought of using tape!!! It looks amazing...
Looks great! I just did the same thing last week using contact paper that I cut into stripes. This looks even easier.
awesome!!!
this is awesome!! I really thought it was paint before!
Very cool idea. I thought it was paint when you did the reveal post!
Wow, super creative and lots of impact- I love it! Thanks so much, I'll be linking.
What a brilliant idea for a rental! Boo to plain white walls!
Such high impact for such low cost! Another brilliant project :) You and Jon make quite the team!
This is brilliant! I love that thicker tape is available. Who says you can't do anything fun in rentals?
Ahhh!!!! Now that might just be the cleverest thing I ever did see!
You never cease to amaze me! Where do you come up with this stuff! It looks great and was likely a bit of a pain n the butt to do:) kudos to Jon!
Camila- Wow! You completely changed the proportions of the room! I'm so impressed! What a lucky sister.
Loretta
Great idea and it looks fantastic! I do so love the pop of black & white together, too. (BTW, I bought a wide angle landscape lens for my camera and now I can get superwide shots. What do you think?)
@SweetNothings - I have a tip for you for NO bleed through while painting stripes. Put the tape up and then lightly seal all tape edges with the color underneath. Then when you paint your color over, your "seal" prevents it from bleeding through and you have perfect lines. Voila!
Great post and inspiration -- thank you! :)
great idea!!!
Camila, very clever idea! So pretty.
love this idea! we're renting and i've been jonesing for a project - this could be just the thing!
I love this idea, Camila! Downright creative and it turned out looking fabulous.
I'm linking to your tutorial in my "did you know" post and including one of your close-up images. Let me know if you'd rather I didn't use your image and I can remove it. Thanks Camila!
I just included your post on my blog today. It's unofficially DIY Tuesday in my world.
http://imperfectnest.com/diy-tuesday/
SO I used electrical tape in my room last year, and when I removed it a year later, it pulled off some of the tape with it. I really liked using it, and want to do it in my new room, but I'm worried it'll cause damage...Have you had any issues with that?
Wow I am so in love with this idea. thank you so much for sharing. I am your newest follower. Come and say hi and please follow back
A mommy's life...with a touch of YELLOW
tyandwhitneyulrich.blogspot.com
If you want to make your home really look really beautiful , paintings are the best way to do it believe home looks very well decorated . If you are looking to find Oil Paintings Reproductions at very economical price or cheap rates, you must visit wahooart.com
Post a Comment
Subscribe to Post Comments [Atom]
<< Home